
Apr 26, 2023
Hugo
David

Ensuring your domain's security and reputation remain intact is always of higher priority. This drives impact across functions, be it marketing (searchability on search engines), business (email deliverability), and, of course, security (protection against adversaries).
One critical aspect of domain management is monitoring and analyzing domain mail exchange (MX) records, which facilitate the routing of emails between servers. A solid MX record reputation is essential for maintaining seamless email communications and safeguarding against potential cyberattacks.
To stay ahead, businesses must employ an efficient and robust automation platform to continuously analyze and monitor their domain MX records.
Companies can effectively streamline this process by integrating powerful tools like MxToolbox, AbuseIPDB, and ipinfo and gain valuable insights into their domain's health.
This article will delve into the significance of automating domain MX records analysis and discuss how implementing such a workflow can significantly bolster a company's overall domain reputation management strategy. To do so, we will orchestrate 4 tools:
Check domain MX records - Why and How?
Manual domain analysis, particularly for MX records, can be repetitive, time-consuming, and labor-intensive for IT teams with numerous responsibilities. To address this issue and enable a more efficient approach, creating and implementing an automated process for analyzing MX records is crucial.
The primary goal of automating the process of checking domain MX records is to allow IT personnel to focus on higher priority. At the same time, the automated system continuously monitors, analyzes, and reports on the health of the domain's MX records. By incorporating a well-designed and reliable automation platform, businesses can save time, effort, and resources, increase accuracy, and minimize the risk of human error.
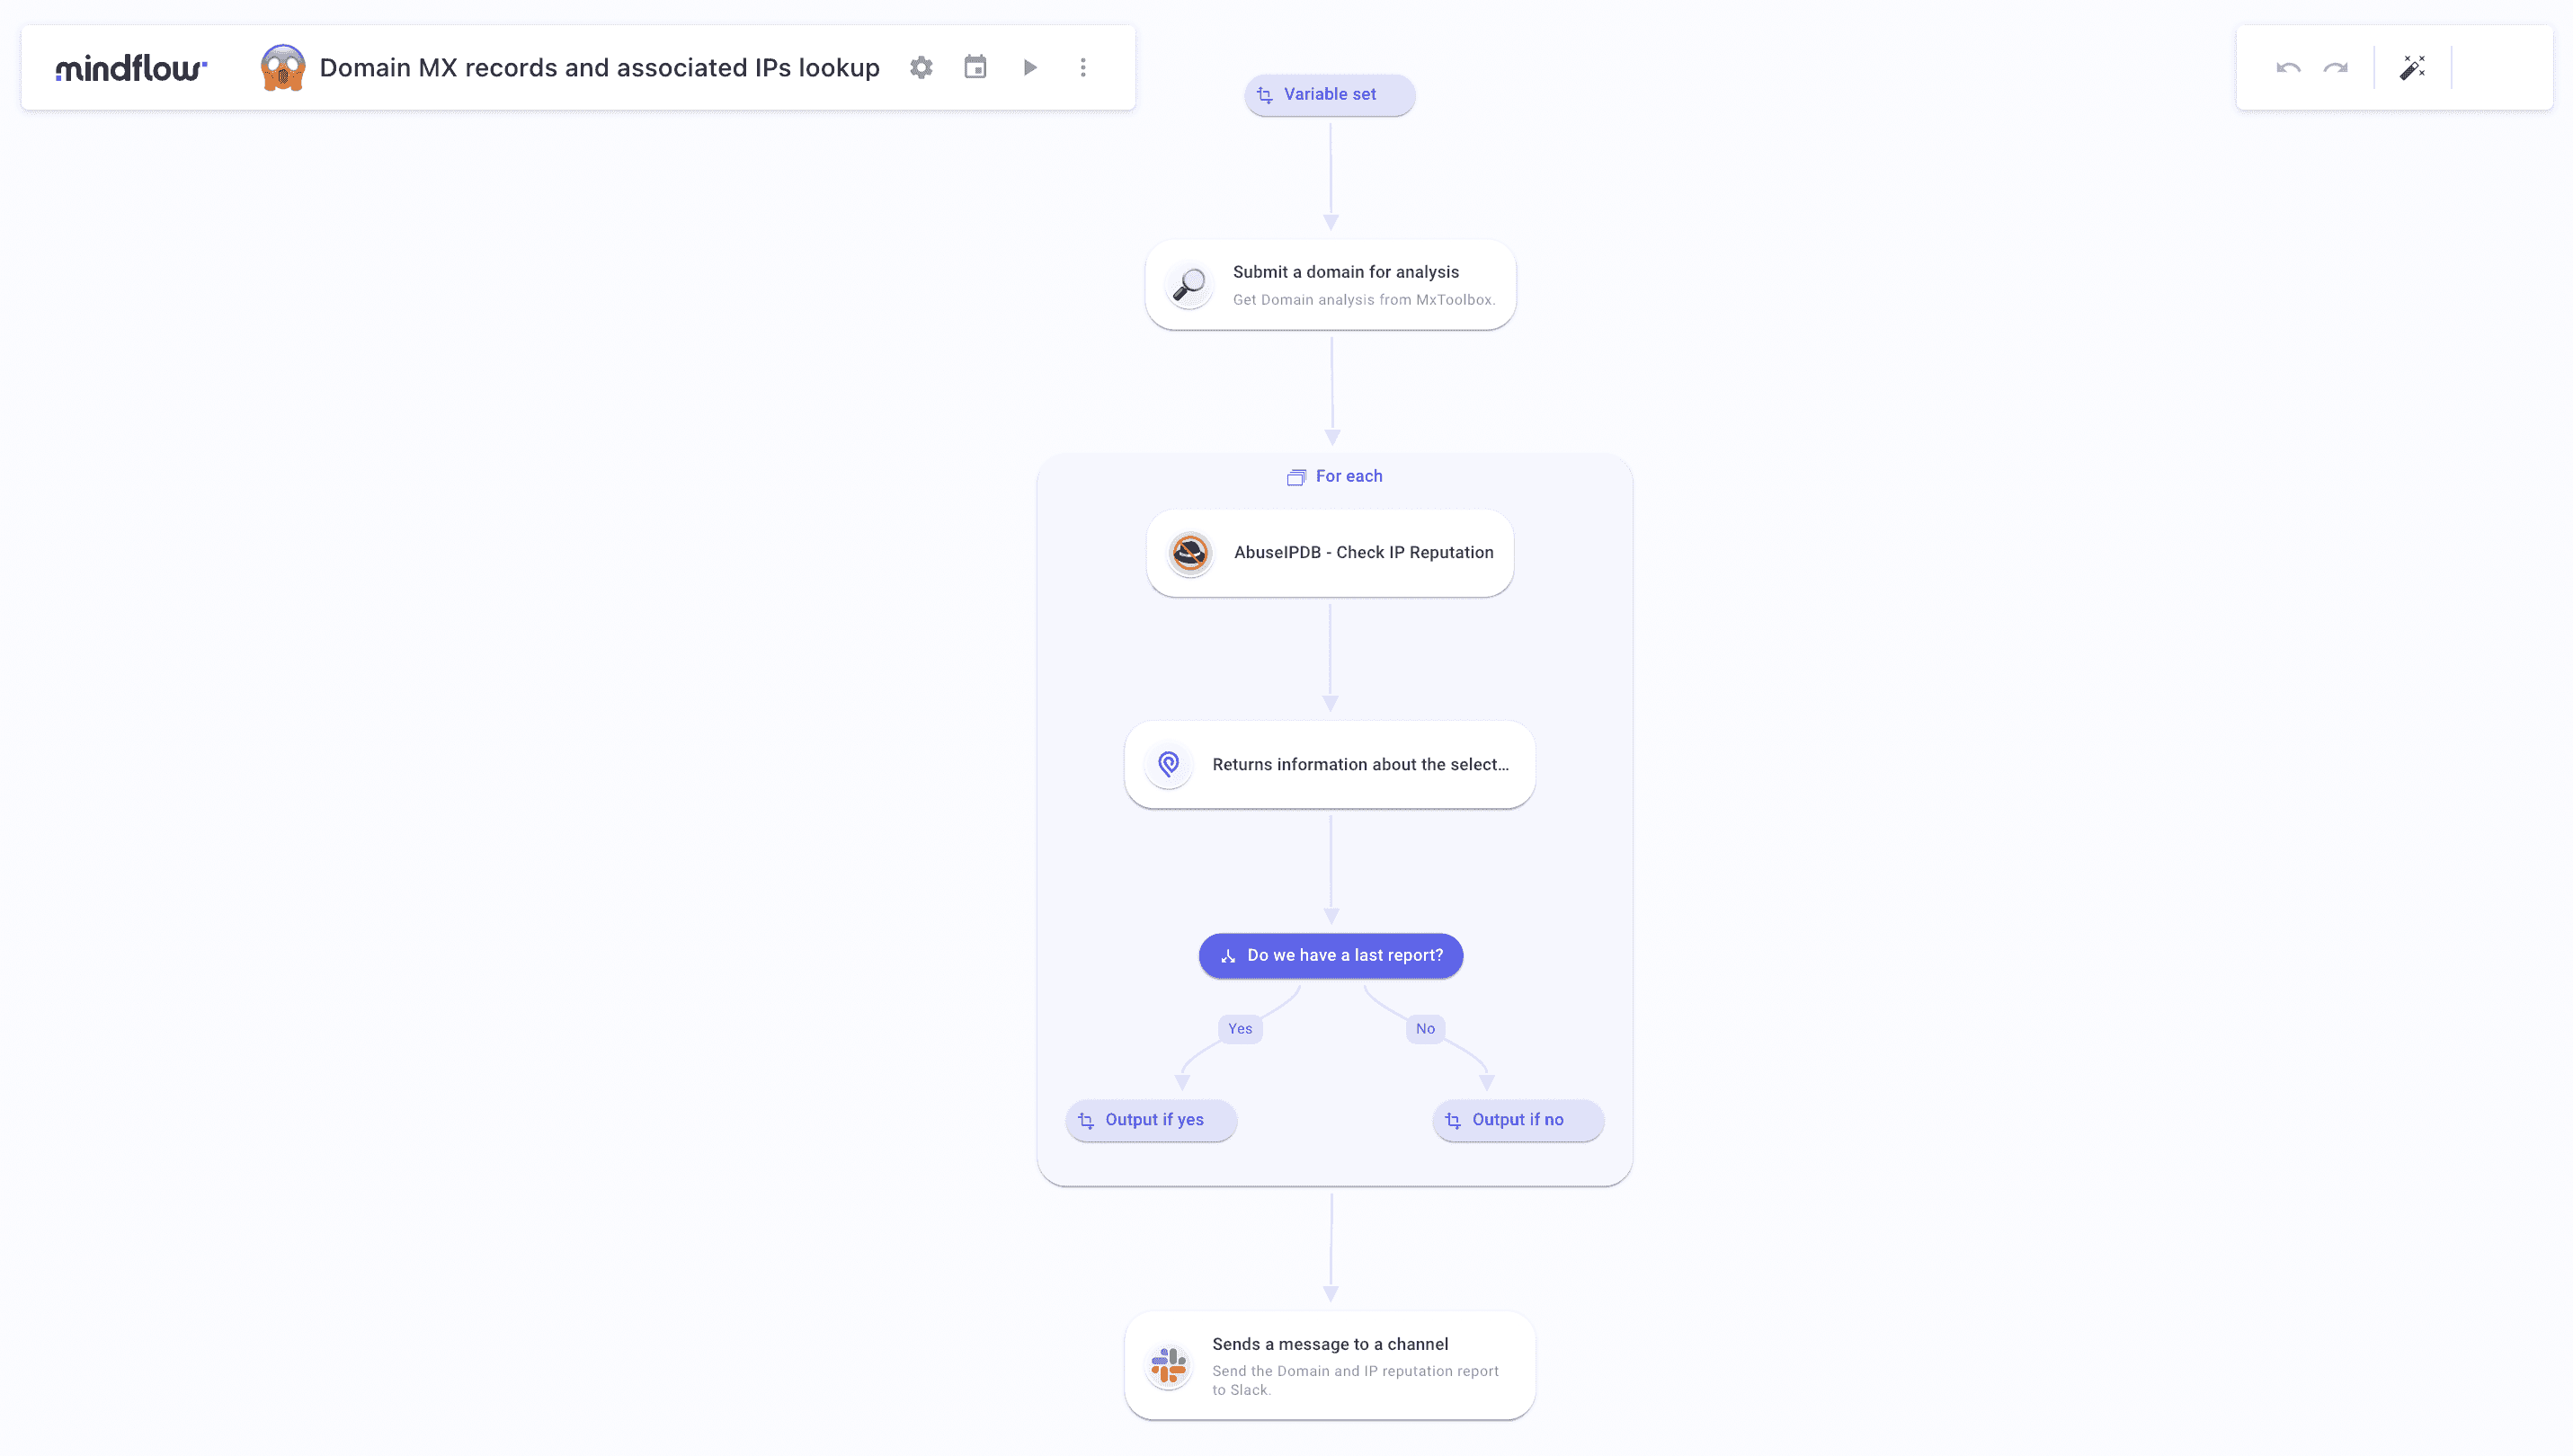
The following Flow is designed to automate a domain analysis system for MX records to deliver comprehensive reports directly to the IT team via their preferred internal communication channels or ticketing software. These reports will provide valuable insights into the domain's health and flag potential issues, allowing the team to proactively address any concerns and prevent negative impacts on the company's email communications and domain reputation, such as IP rotation, de-listing requests, or any other action needed.
In addition to these benefits, automating the domain analysis process for MX records offers several other advantages:
Scalability: As a company expands and manages multiple domains or subdomains, manually checking all MX records becomes increasingly challenging. An automated system can quickly and easily scale to accommodate the growing needs of the business, ensuring consistent and accurate analysis across all domains.
Real-time monitoring: The automated process can be designed to provide real-time updates on the status of MX records, alerting the IT team to any anomalies or potential threats as they emerge. This enables faster response times and more effective mitigation strategies.
Historical data analysis: An automated system can store historical data on the domain's MX records, allowing the IT team to identify patterns, trends, and potential areas of concern. This information can be instrumental in making informed decisions and planning for the future.
Integration with other security tools: By incorporating an automation platform that works seamlessly with other security tools, businesses can create a comprehensive and holistic approach to domain reputation management. This integration enables a more in-depth analysis of potential threats and enhances the company's overall security posture.
Here is a sneak peek at the final Flow before we get our hands on it.
Steps to automatically check domain MX records
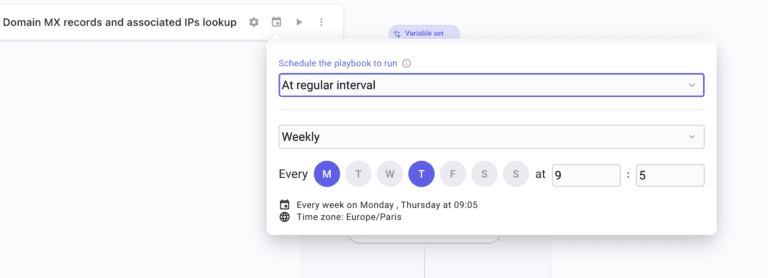
Once you have created the Flow, you must set the trigger first. To do so, select the calendar at the top left of the page. Under "Schedule the playbook to run," select "At regular intervals." Then, select "Weekly." Finally, fine-tune the scheduler by choosing the days, hours, and minutes. In our example, the Flow will be triggered every Monday and Thursday at 9:05 a.m.
Now, on to the actual flow design process.
First, You will set an empty variable called "message" written below in the Flow.
Query MxToolbox API and the Lookup API call. We know we will query an MX record report to MxToolbox. So, in Query Parameters, under the "Command" parameter, type "mx," and in "argument," type the domain on which you want to launch the analysis.
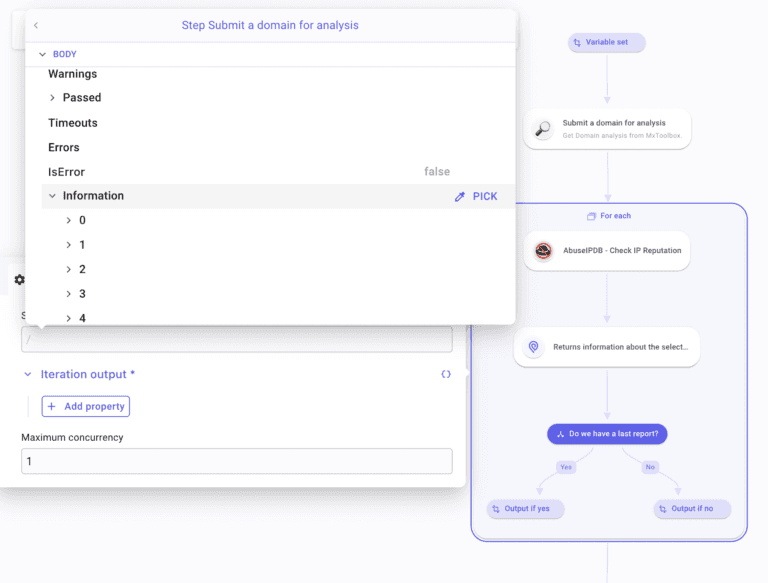
Right after this step, create a For-each loop. Go into the For-each settings and, under the "Source" field, type "/" and get the MxToolbox step execution. Introspect the API call answer and select the table "Information" for the For-each loop to iterate on.
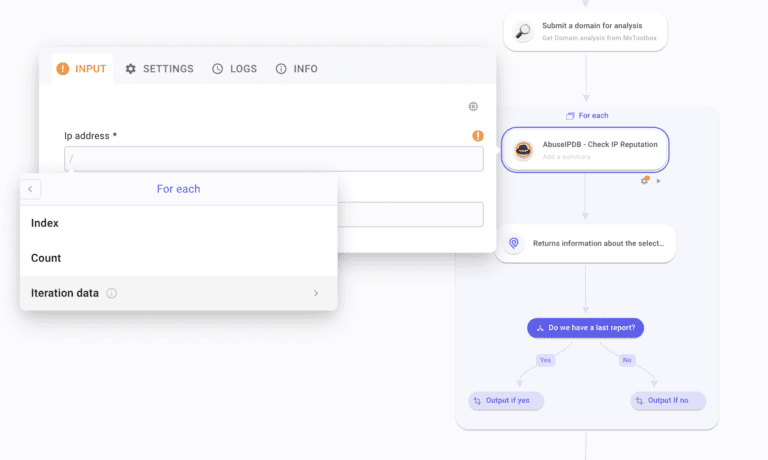
Inside this For-each, create an AbuseIPDB API call by querying /checking. Under IP address, type "/" and select For each inside the Iterations section. Select Iteration data and finally pick the field "IP address." In the second input field, "Max age in days," type the number of days you want to perform the analysis up to 90 days.
After this step, create an IPinfo API call /getInformationByIp. To configure this step, invoke the "IP address" field under the "Ip" field from the For each iteration data.
Considering the AbuseIPDB call answer format, we need to perform a data transform on a particular field, "lastReportedAt." When there is no report on the days you performed the analysis, the field will return an empty value. To format this, create a condition named "Do we have a last report?" leading to two "Transform data." In the "Yes" branch, invoke a Compare function. Fetch the field "lastReportedAt" inside the AbuseIPDB step and inspect the "data" table to select the targeted field.
Once done, apply a JSON path function. In the "Query" field, c/c "$.lastReportedAt," then in "Result delimiter," type "n." This will inspect the invoked data and return only the "null" expression. Back to the Compare tab, select "Is not equal to" in the drop-down, then type "null." Do the same process in the "No" branch but select "Is equal to." Your condition is set.
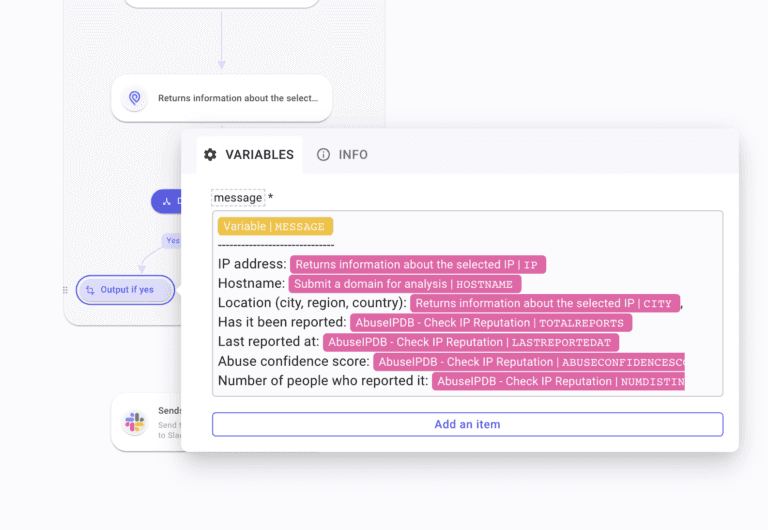
Following this condition, go into the Transform data in the Yes branch. Then, you will create and name your variable "message," call the first variable "message" created at the beginning of this Flow. Then, populate this variable with the following information and invoke the different sets of data needed right next to them:
IP address
Hostname
Location (city, region, country)
Has it been reported
Last reported at
Abuse confidence score
Number of reporters
Do the same for the other branch but withdraw "Last reported at." The For-each loop is complete.
At the exit, create a Slack /chat.postMessage API call. Paste your Slack channel ID in the "Channel" field. In the "Text" field, type a sentence to introduce your report and then call the variable "message" that will come out of the For-each loop pre-formatted.
Your Flow is complete. Now, every Monday and Thursday, at 9:05 a.m., your team will receive fresh reports that check domain MX records and report all associated IP addresses and their reputation.
Conclusions on automated check domain mx records Flow
When designing this Flow, you can modify it to enable multiple check domain MX records to monitor the domains under your supervision. To do so, create a For-each loop comprising the MxToolbox step and the first For-each loop. In this new For-each loop's "Source" field, type the selected domains you want the check domain mx records analysis to be performed.
Then, in the MxToolbox "argument" field, you will invoke the For-each iteration data. Thus, your first For-each loop will iterate on every domain typed, and the second For-each loop will analyze the IP associated with every domain. You will have to choose how you want to display the results. In one big message or separated into different messages. For this, either leave the Slack step outside the For-each loops to have as many messages as domains analyzed or put the Slack step outside the two For-each loops and format it accordingly.
Such a Flow running at regular intervals, without the need to trigger it every time, ensures teams save time every week. They will receive their report on Slack or any other communication medium (email, Teams, Jira, Opsgenie, or the like) and see the reputation of every IP associated with the domain.