Apr 17, 2023
Hugo
David

Today, we will learn how to create a ChatGPT personal data anonymizer Bot with Mindflow.
Organizations and people increasingly use ChatGPT and other advanced language models, so they have difficulty monitoring what is being sent to these new tools. Organizations cannot go back in time and forbid using this immense value provided by tools such as ChatGPT. However, ensuring the protection of personal or sensitive information is not something you can ignore because you don't want to feed ChatGPT personal data!
By leveraging Mindflow's capabilities, the following Flow aims to enable organizations to find the balance between the opportunities brought by ChatGPT and Data protection. We connect chatbots like Slack, Microsoft Teams, Google Chat, and Discord to ChatGPT. Still, we also provide a way to monitor what is being sent by analyzing the data between your internal communications channel and ChatGPT to detect and, if needed, anonymize Personally Identifiable Information (PII) before sending to ChatGPT personal data.
This Flow adds an extra layer of security, reinforcing your organization's commitment to data privacy. In this article, we will delve into the various aspects of this workflow and explore the process of setting it up on the platform. To create it, we use three tools: The goal of the ChatGPT personal data anonymizer Bot.
Achieving the perfect balance between productivity and protection is critical to modern business operations. With new tools like ChatGPT, you must conciliate value-added productivity with security and privacy.
The primary objective of this Flow is to extract the payload from an incoming webhook, such as one from a Slackbot, and effectively detect and anonymize any Personally Identifiable Information (PII) contained within.
This process is essential in preventing data loss and maintaining compliance with Data Protection regulations, such as the General Data Protection Regulation (GDPR) in Europe, the CCPA in California, and other regulations worldwide.
A quick look at the final Flow before starting to work.

Trigger ChatGPT personal data anonymizer bot
We will use Slack for the chatbot, but remember that Mindflow provides integrations with other internal communications channels, such as Teams (we already saw how to create a chatbot in Teams and connect it to Mindflow here), Google Chat, or even Discord! This adaptability ensures the workflow remains versatile and functional according to your organization's tools.
We will start by creating a new command for the Slackbot. Hop on https://api.slack.com, connect to your workspace, select the Bot for Which you want to create your command, and select "create a new command."
In the field "Command," create the future command you want to provide on Slack. We will use "/GPT." In the "Request URL field," copy and paste your workflow webhook URL. This URL is automatically generated and unique for each workflow when it is created.
From now on, once a user initiates a command followed by a prompt, the whole payload is sent to Mindflow and triggers the Flow.
This Flow first extracts the data field containing the prompt the user wants to submit to ChatGPT. The prompt is then submitted to AWS Comprehend for PII analysis and identification.
Identification of PIIs
To detect any PII contained in the Slack webhook payload, we will use AWS Comprehend, a powerful natural language processing (NLP) service designed to analyze and process text data and identify key patterns and elements within a submitted payload.
By providing seamless integration to AWS Comprehend and the whole suite of AWS native services, Mindflow ensures that submitted data analysis is efficient and accurate, further enhancing the overall user experience.
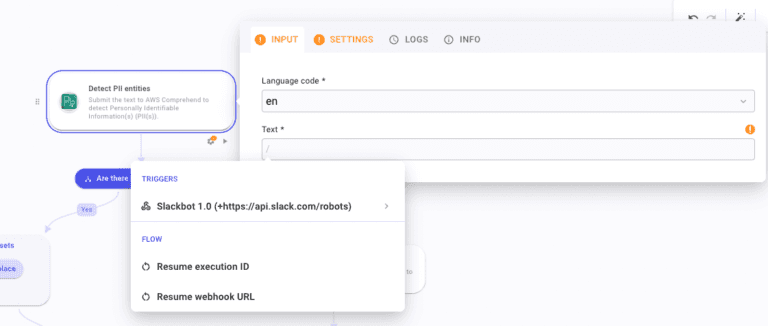
To use AWS Comprehend, we will create an API call using the action "/DetectPiiEntities."
To enable API call authentication, you will have to go to the "Settings" panel and select your AWS credential. You must also choose your AWS server location by selecting your region in the drop-down. Then, head to the "Input" tab to predetermine the input you will send to Comprehend. Type "/" and look into the Trigger Slackbot 1.0. Find the "Text" field and pick it to create a dynamic pill.
This API call will return different values used in the Flow's next steps. In the body, you will see the parent "Entities" that will gather the following attributes for each PII detected, if there are any:
"BeginOffset": number of the first letter of the detected PII.
"EndOffset": number of the last letter of the detected PII.
"Score": Confidence that the detected data is a PII from 0 to 1.
"Type": Type of PII detected.
Initial triage
To determine subsequent steps after your Comprehend call, you must create a condition immediately. The goal here is to determine if Comprehend has detected any PII. To do that, we are going to make two conditions to compare the value of "Entities" to a fixed value:
Create the first branch with an OpenAI API call as the output. Go to this branch settings and invoke the "Entities" parent value by typing "/" and picking "Entities" in the API call answer. Now select "is equal to" and type "[]" (the value returned when there are no PII in the text analyzed).
Create the second branch that will lead to a For-each loop. In this branch settings, select again "Entities" and select "is not equal to" and type "[]" (because if Comprehend detects PII, the [] will contain values).
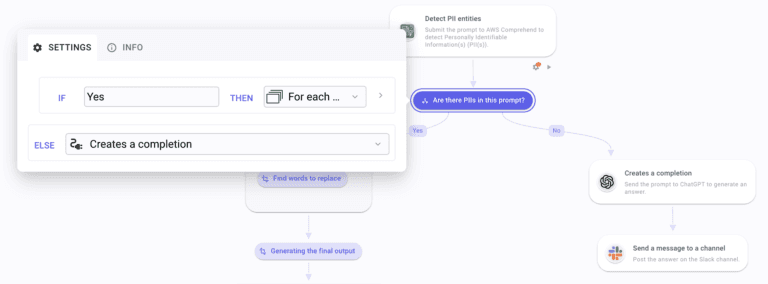
To sum up, if Comprehend detects any PII, the Flow will proceed toward the For-each loop. If not, it will directly proceed to the OpenAI API call.
Finding and replacing words
We will use the API call answer payload to find the words detected as PIIs inside the For-each we have just created.
First, configure the whole For-each loop:
In the "Source" field: again, go and invoke the field "Entities" from the Comprehend API call
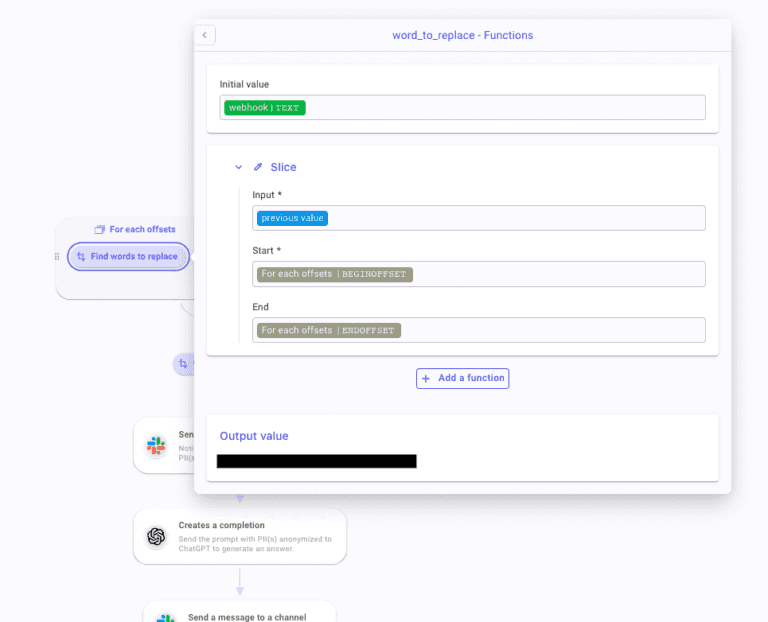
Create a data transform inside the loop: Create a variable, "word_to_replace," in which you will invoke the webhook payload. Click the "fx" button on this variable and apply a "Slice" function. Fill in the following data in the different fields.
Input: "previous value."
Start: "BeginOffset" from the Comprehend API call answer.
End: "EndOffset," in the same location as BeginOffset.
Back in the For-each settings panel. In the "Iteration output" section, create a variable named "word_to_obfuscate." In this variable, call "word_to_replace.
The For-each is configured. Now, let's create a Transform Data that will come right after this loop. In this Transform Data, create two variables:
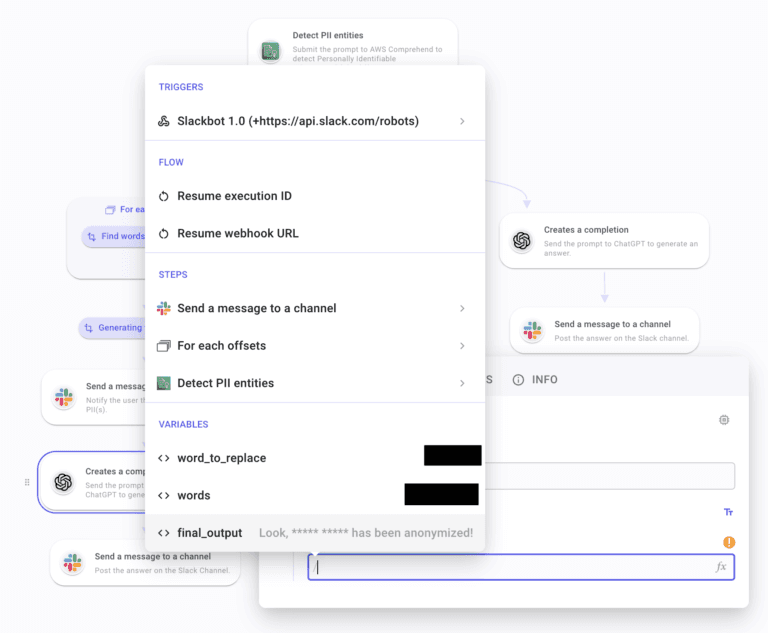
"words": as input, type "/," and select the For-each and the "All iterations output array." On this variable, click on "fx" and apply
a JSON Path function: in Query: type “$[*]["word_to_obfuscate"]” and "|” in Result delimiter
a Find/Replace: type """ in Find and "blank_space" in Replace.
"final_output" and invoke your webhook payload. Apply a Find/Replace function and call ("words") in the Find field between parenthesis and type "****" in Replace.
Ok, the hard part is now done. From now on, when PII queried through this chatbot command is detected, this Flow will detect and anonymize all of them before sending the data to the party tool ChatGPT in our example.
Notifying on Slack
You may want to notify the user who submitted this prompt that they sent personally identifiable information online!
To do that, create a Slack API call that is /chat.postMessage. Configure the credentials and hop on the settings panel. In the channel field, you will type "/" and select the trigger to find the field "channel_id." This is the channel from which the webhook has been triggered.
In the text field, start by writing a warning for the user. Then, you can add the PII-free prompt with / and pick the variable "final_output."
You can notify your Data Protection Officer directly or through a dedicated channel. In this API call, you can add further details, such as other AWS Comprehend data comprised in the API call answer:
"Score": Confidence that the detected data is a PII from 0 to 1.
"Type": Type of PII detected.
Sending the prompts to ChatGPT
Finally, once this triage and notification are done, you can send the final output or the initial one (if no PII is detected) to ChatGPT. To do so, Create a new step and select the /completion action. Select the adequate credentials and hop on the input panel.
Model: Fill in the ChatGPT model you want to use, such as "text-davinci-003" or the one you want.
If you want to use GPT-4 or GPT-3.5 Turbo, select /chat/completions instead, and in the Model field, type either "GPT-4" or GPT-3.5-turbo."
Create a text field under "Prompt" and, according to the branch of the Flow you are in:
call "final_output," or
invoke the initial Slack webhook payload.
Then, to post the GPT-generated answer, create a Slack API call by selecting the /chat.postMessage action.
Channel: "channel_id" found in the initial webhook.
Text: Pick the "text" field in the parent section "choices" in either OpenAI API calls answers.
Here you go! You now have a ChatGPT personal data anonymizer Bot that can be used across the organization to enforce data protection compliance!