Sep 18, 2023
Hugo
David
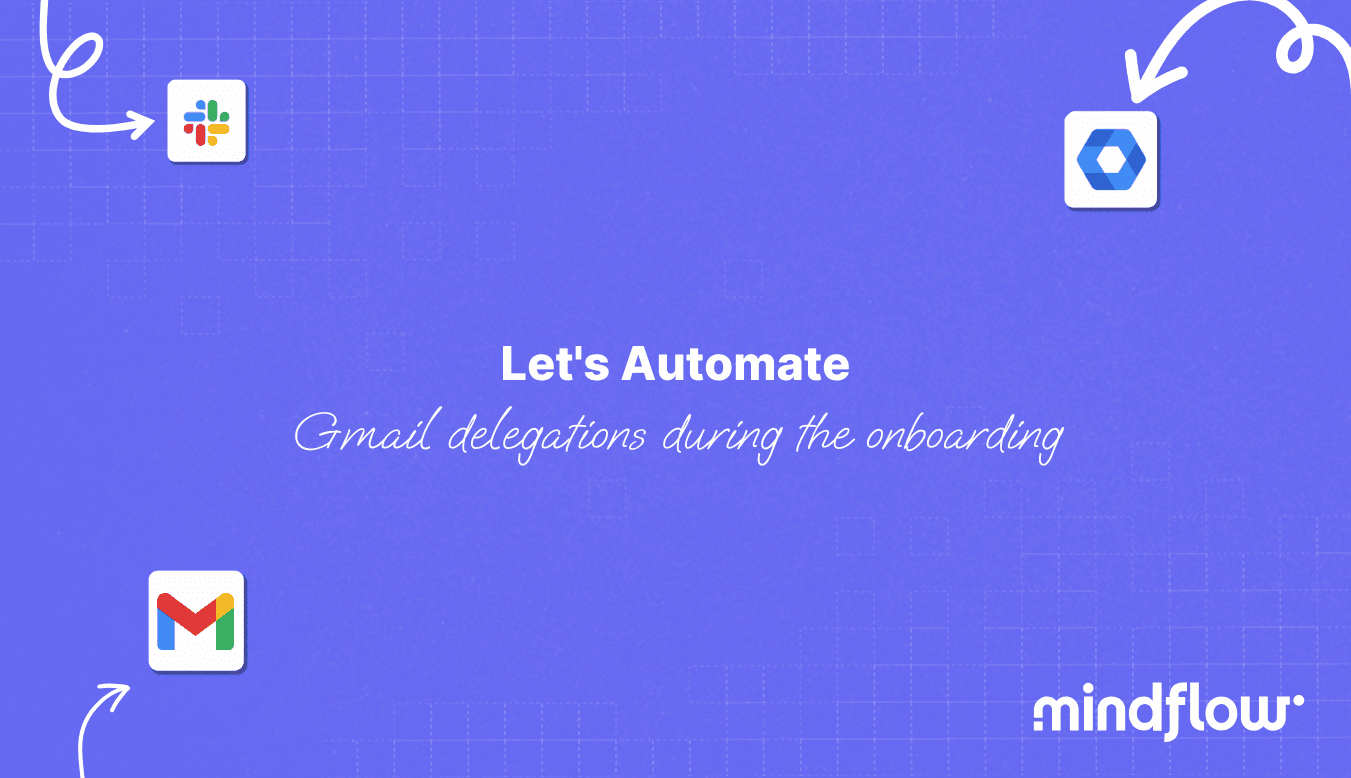
Why automate Gmail delegations?
Today, in Let's Automate, we will learn how a Mindflow user can quickly automate the creation of Gmail delegations for newcomers using Mindflow.
In the organization's daily life, email accounts are often shared with different people. Take your generic email address, welcome@xyz.com, for instance. You typically create this address and delegate its usage to those interested in it, who are in charge of answering incoming emails.
If someone new comes into the team, you must log in to that account and create a new delegation. As much as this process is simple, it is prone to frictions that can add a few minutes here and there. Most notably, the fact that, as it is delegated, you are not likely to connect to this account often. Thus, when you try to connect to it, you must answer authentication challenges and, if enabled, the 2FA.
Also, through the UI, at least on Google Mail, the newly created delegation has to be accepted by the delegated user. This leads to friction and can be easily alleviated. No more than 10 minutes will be enough to ensure that this process never has to be repeated.
We will create a quick flow to handle this process and remove the different frictions. This flow will take no more than 10 minutes and will eliminate your need to perform it continually.
Finally, it can be added to a broader onboarding flow as part of the Gmail account setup with other chunks, such as IMAP, POP, and forwarding setups, to prepare for an email analysis to prevent phishing.
We will only need Google credentials and Slack to use Gmail and Slack APIs to build this flow. Let's get into it.
Automating Gmail delegations: The basics
To put up this flow, we will need two series of credentials:
Google JSON Web Token
As we did multiple times here, we want to retrieve a JWT to authenticate as the user (Google documentation about the process here). In this case, we want to authenticate as the account on which we want to create Gmail delegations. To do this, we will need your service account email address, the private key, and the scope.
To fetch your service account email address and the private key. You can log in to the Google Cloud console, click IAM & Admin, and find "Service accounts" on the left tab. Click the service account you want to use to generate the JWT. Then, click KEYS and click Create a new key. Make sure JSON is selected and Create. Now, open the JSON file your web navigator has downloaded and copy the full key. It starts from "-----BEGIN PRIVATE KEY-----" and finishing with "-----END PRIVATE KEY-----n."
Now, on to Mindflow's Vault. Create a new Credential, and fill in the fields as such:
Service: HTTP
Credential type: Google Service Account
Client email: Paste your service account email address
Private key: Paste your private key comprised in the JSON you just downloaded
Scope: paste "https://www.googleapis.com/auth/iam"
Click Save, and you are good to go.
Slack
For Slack, it is faster. Fill in your workspace ID using this URL: https://api.slack.com/apps/YOUR_WORKSPACE_ID/oauth? and ensure the Bot scope chat:write is granted. Then, create a Slash command that will trigger your flow. Once we have created the flow on Mindflow, we will retrieve the webhook URL in the next step.
Mindflow
Create a new flow. Name it as you want and choose its emoji. Once created, open it and click the gear icon on the top left of the canvas, next to the flow's title. Copy the second URL from the bottom and paste it into the Slack Slash command creation window in the Request URL. Click save.
Okay, the basics are done. We are good to start building!
Automating Gmail delegations: Building the flow
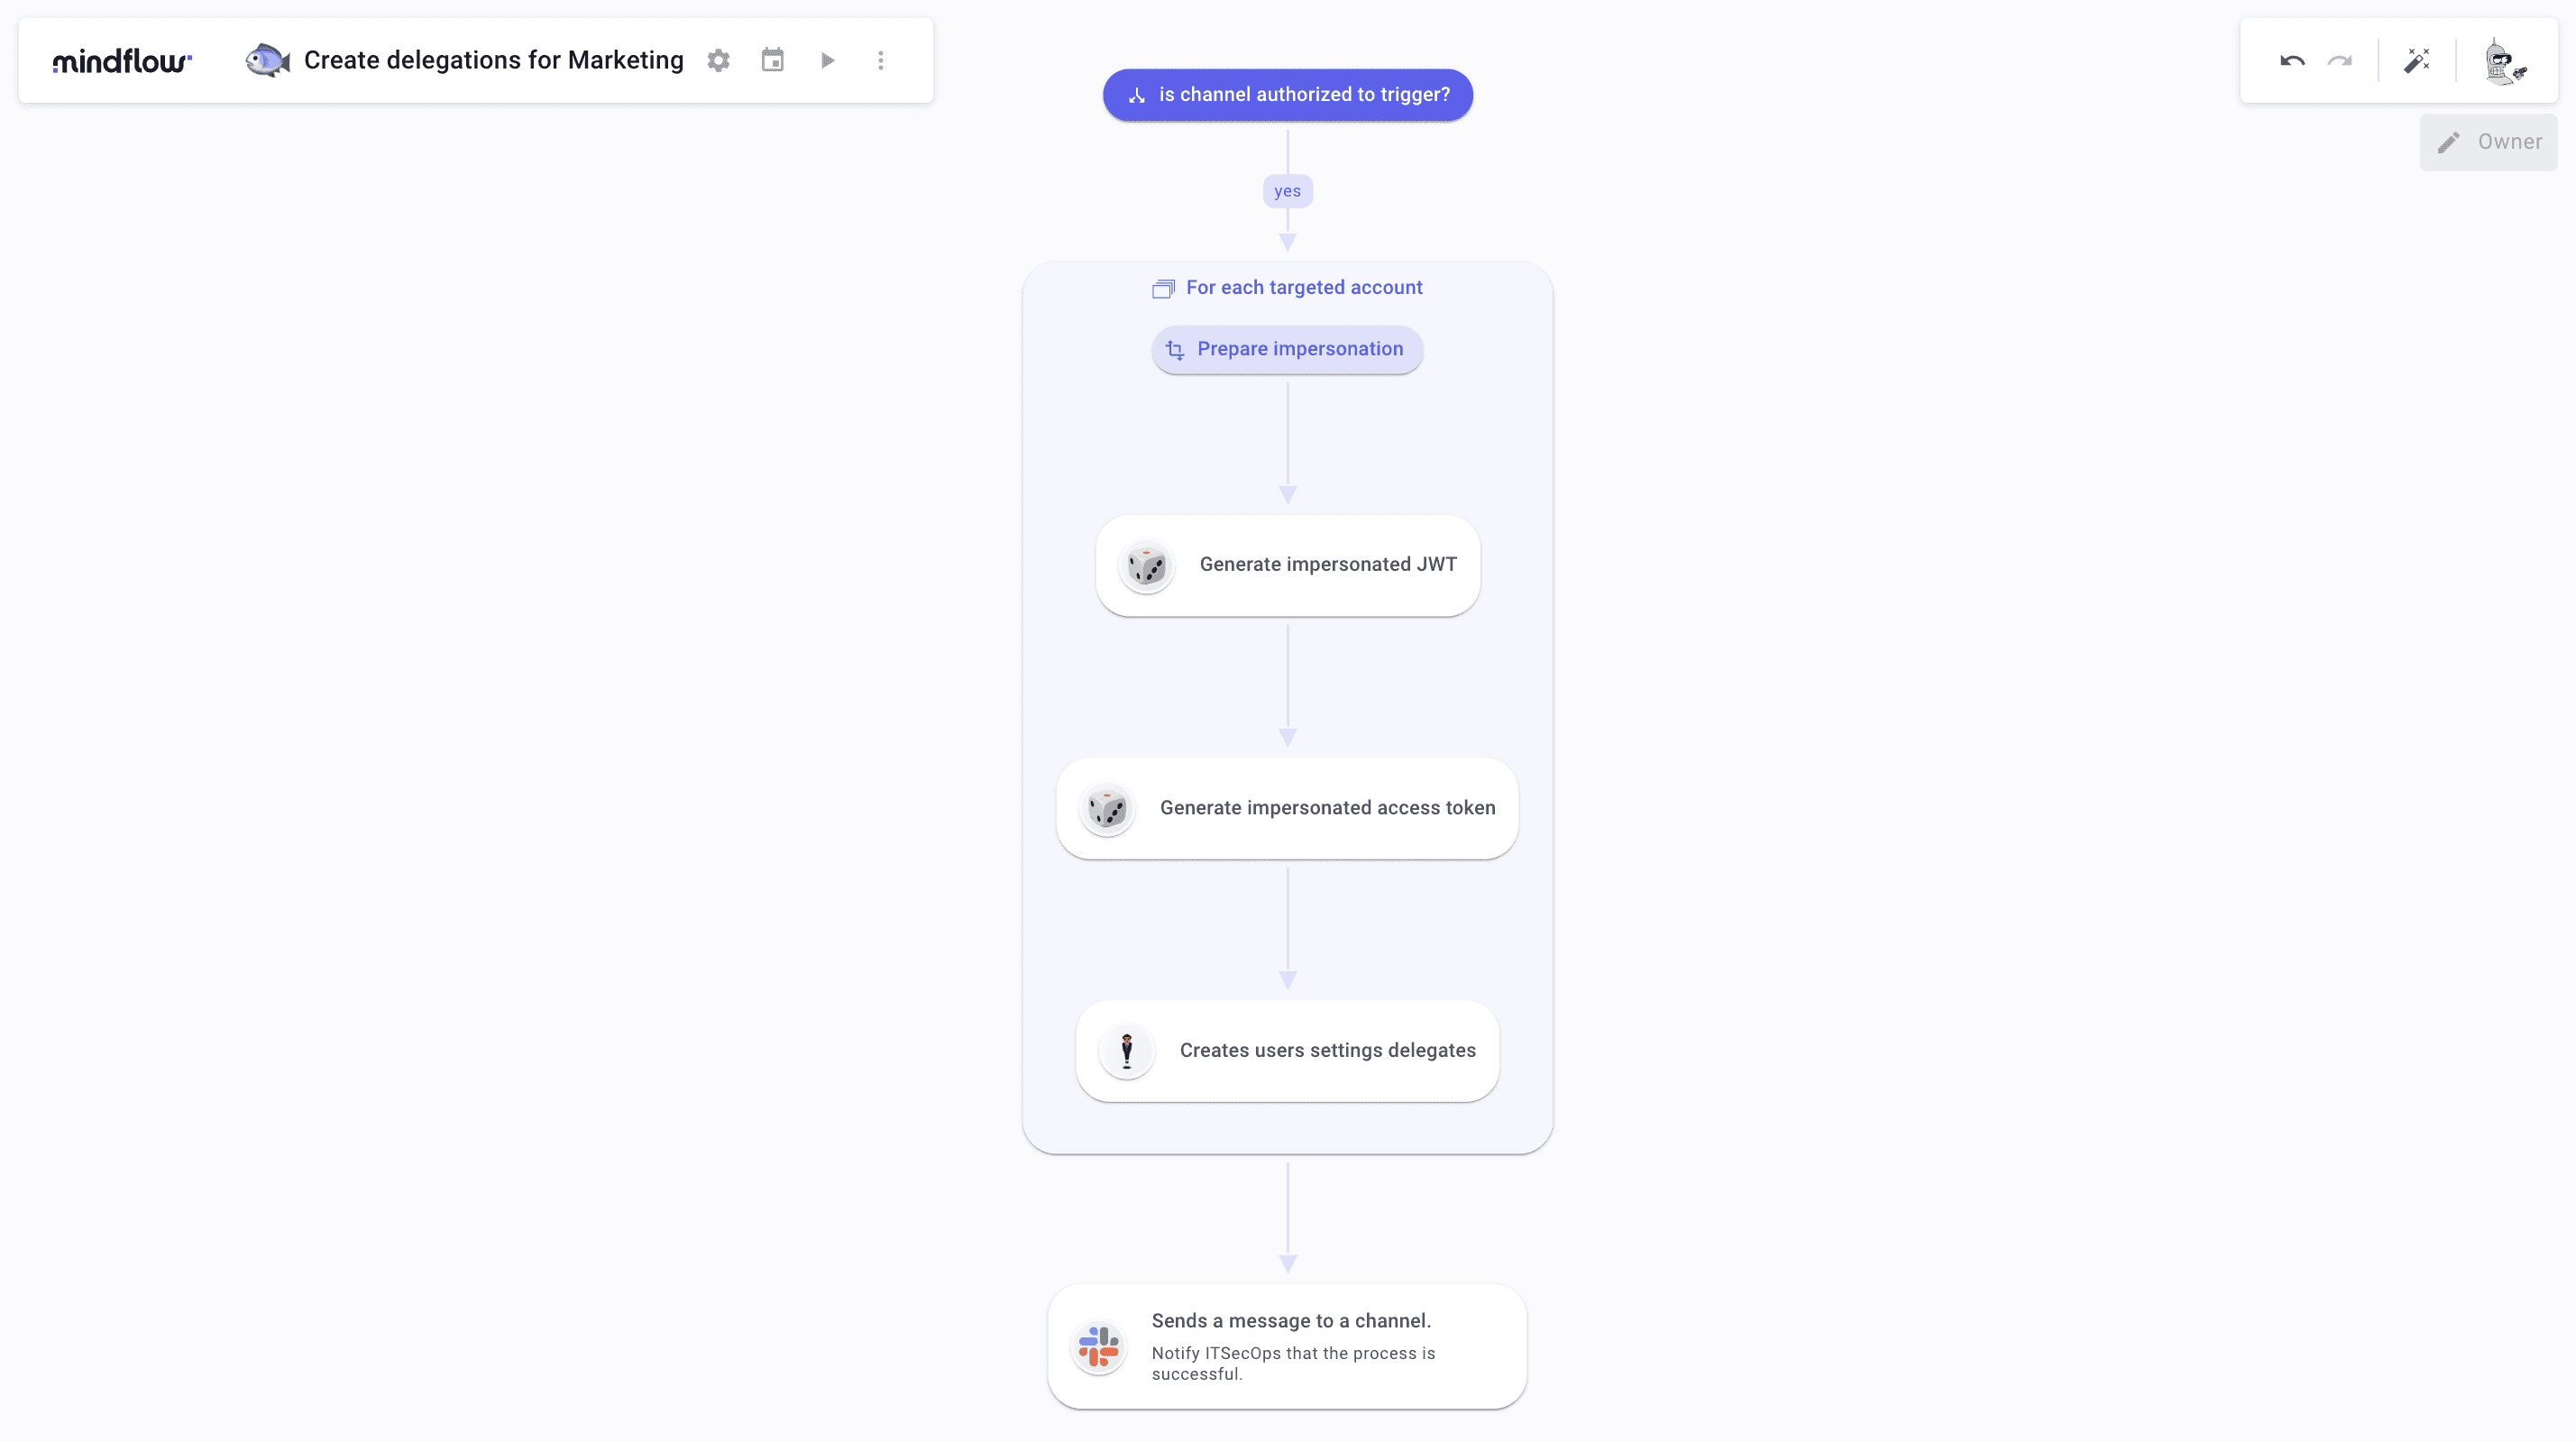
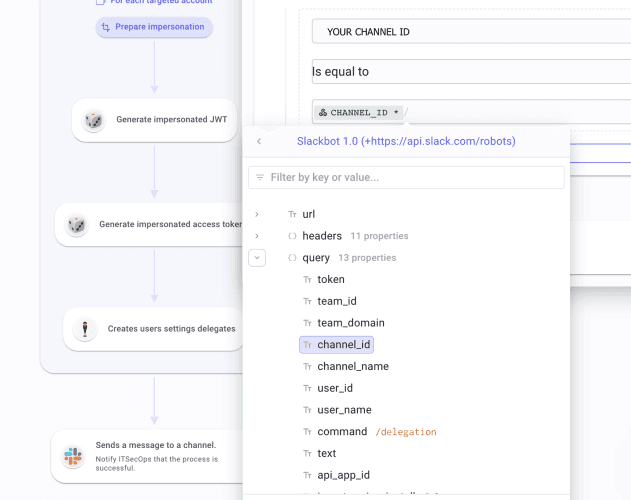
To create Gmail delegations, the first thing we want to do on this flow is secure its triggering to only authorized channels. To do so, start by activating the flow from Slack to generate a log we can work with. Once done, create a condition named "Is channel authorized to trigger?" and create a branch named "Yes," leading to a For each loop named For each targeted account.
Open the condition's configuration panel and the yes branch. In the first field, retrieve the channel ID from which you want the flow triggered on Slack. Select the operator "Is equal to" and, in the last field, open the Data Picker tool (DP) with "/", click Slackbot in TRIGGERS, open the object query, and find the key named channel_id. Pick it to create a dynamic pill to retrieve the value attached to channel_id for each execution.
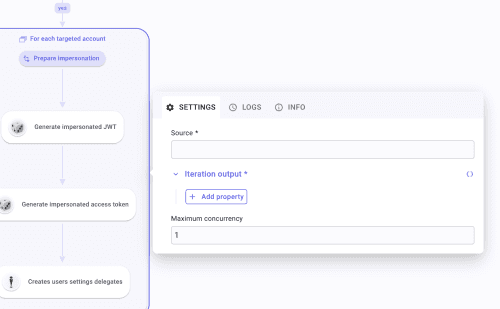
Once done, open the For each targeted account's configuration tab. In Source, write in an array the different email addresses you want to create Gmail delegations on, such as ["welcome@x.fr," "it@x.fr"].
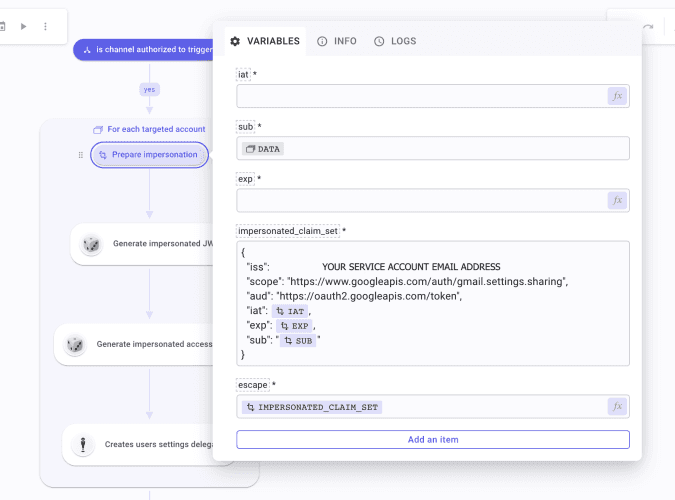
Let's head to the fun part now: the impersonation flow. Inside For each targeted account, create a Transform Data step named Prepare impersonation. Open its configuration tab. Add an item to create five items you will call: iat, sub, exp, impersonated_claim_set, and escape.
Configure them as such:
iat(issued at): Click fx and then "Add a function," look for the function "Get time" to generate the current Unix time in seconds.sub(the impersonated account): Open the DP, click For each targeted account, and select "Iteration data."exp: invokeiatand apply a Sum function where you will add 3600 seconds to the previous value, which is the current Unix time. This will set the lifetime duration of the JSON Web Token that we will generate later.impersonated_claim_set: Paste and complete the following JSON:
{
"iss": "[YOUR GOOGLE SERVICE ACCOUNT ADDRESS]",
"scope": "https://www.googleapis.com/auth/gmail.settings.sharing",
"aud": "https://oauth2.googleapis.com/token",
"iat": [call iat],
"exp": [call exp],
"sub": "[call sub]"
}
escape: callimpersonated_claim_setand apply an Escape string function configured as such: Escape level * Special chars, Escape quote * Double, JSON Compatible enabled.
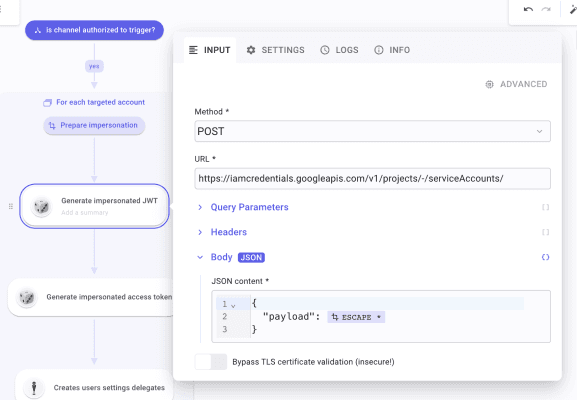
You are ready to proceed forward! From there, we will have to create HTTP Requests by hand. Create the first request, which is named Generate impersonated JWT token. Set "Method" to POST. In "URL" paste https://iamcredentials.googleapis.com/v1/projects/-/serviceAccounts/[YOUR SERVICE ACCOUNT ADDRESS]:signJwt. Open the Body section and mark it as JSON. Inside write
{ "payload": [Invoke Escape] }
In the SETTINGS panel, make sure you have selected your JWT credential. Run it once to generate a JWT.
Okay, our impersonation is done! The flow is pretty much done from that point. What we still have to do is create an HTTP Request leading to a Gmail API endpoint to update the Gmail delegations now that we have the impersonation with the corresponding scope: https://www.googleapis.com/auth/gmail.settings.sharing.
Right after Generate impersonated JWT token, create an HTTP Request, name it Creates users settings delegates. Open the configuration tab and fill it as such:
Method: POST
URL: https://gmail.googleapis.com/gmail/v1/users/["/" to pick in the For each "Iteration data"]/settings/delegates
In the Headers:
Create an item and name it Authorization
In it, write "Bearer " (mind the space after Bearer). Then type "/" to retrieve access_token in Generate impersonated token logs.
In Body, create a JSON and write:
{"delegateEmail": "["/" to pick the key text in the Slackbot log]","verificationStatus": "accepted"}

For each targeted account, it is set up! One last step to create. We want to notify the channel that Gmail delegations have been appropriately created. To do so, create a step after the For each loop and type either Sends a message to a channel or chat_postMessage in the Finder. Open the configuration panel and make sure the correct credentials are filled in in the SETTINGS tab. Then fill in the fields Channel and Text as such:
Channel: ["/" to pick channel_id in the Slackbot log]
Text: Gmail delegations for ["/" to pick text in the Slackbot log] successfully created on: [type the targeted accounts].
Run the entire flow once from Slack to check everything checks green, et voilà, automated Gmail delegations!