Oct 27, 2023
Hugo
David
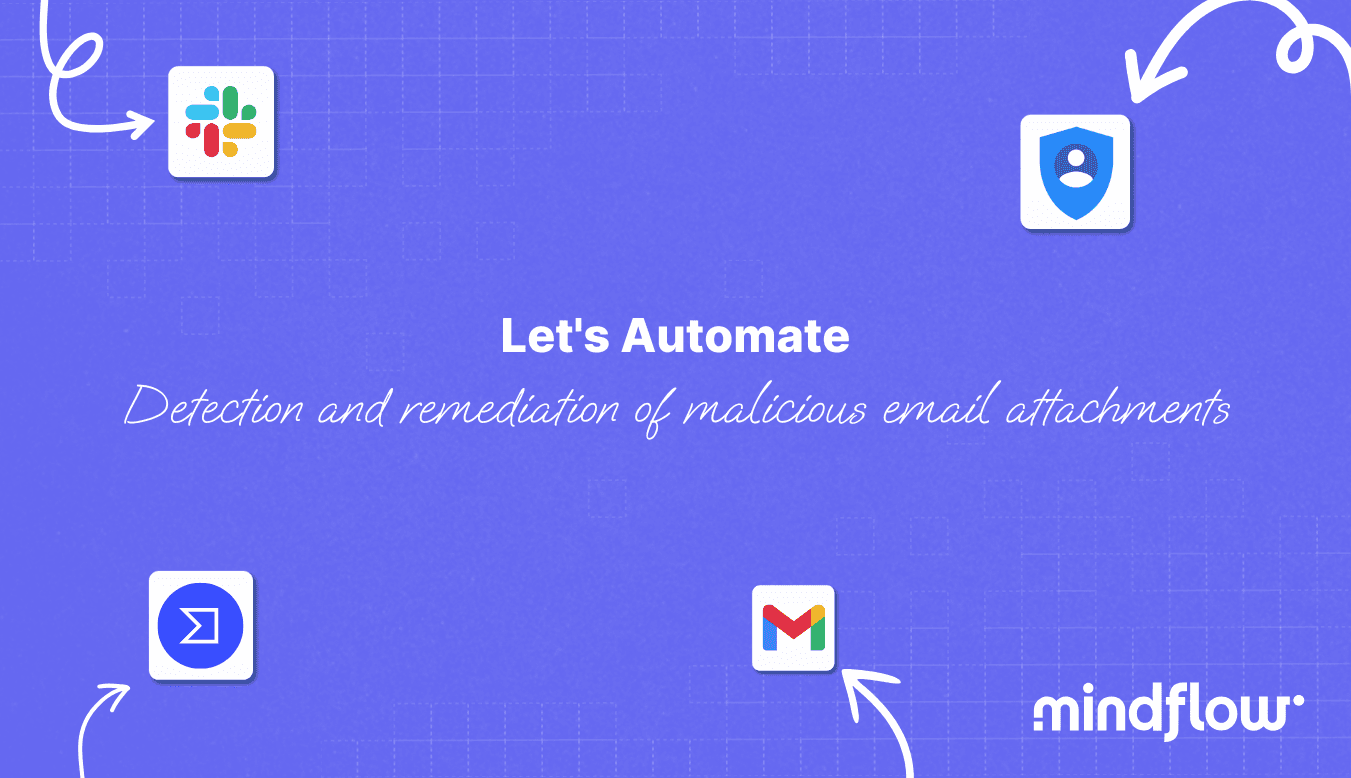
Today, Let's Automate is about detecting and remediating malicious email attachments.
You already know we will discuss one of the most significant topics regarding cybersecurity: emails, more precisely, malicious email attachments.
No matter the amount of cybersecurity awareness training or campaigns, phishing campaigns, or threats, this will always be the number one entry factor into your systems.
We're not gloomy, but the numbers are precise: Emails were still the first entry point in the last DBIR report! This trend will continue with the "benefits" that generative AI will bring to the people behind these attacks.
IRL: An experience shared by a Mindflower:
Not so long ago, I was looking for a place to rent. I sent messages to apply to different listings, and, I bet you not, I always received some emails saying, "My wife and I are living abroad, Bla Bla Bla, please make the first transfer to this account number, etc." No grammar mistakes, contextualized; only the names differed from those in the listing. The overall email was "chatgptesque."
These augmented phishing emails with generative AI will only grow, as it is way too easy for openAI to write a malicious email.
Add malicious email attachments to the mix, and you have a recipe for disaster. In a previous blog post, we learned to automate the analysis of incoming emails to detect the following IOCs: malicious IP addresses and URLs.
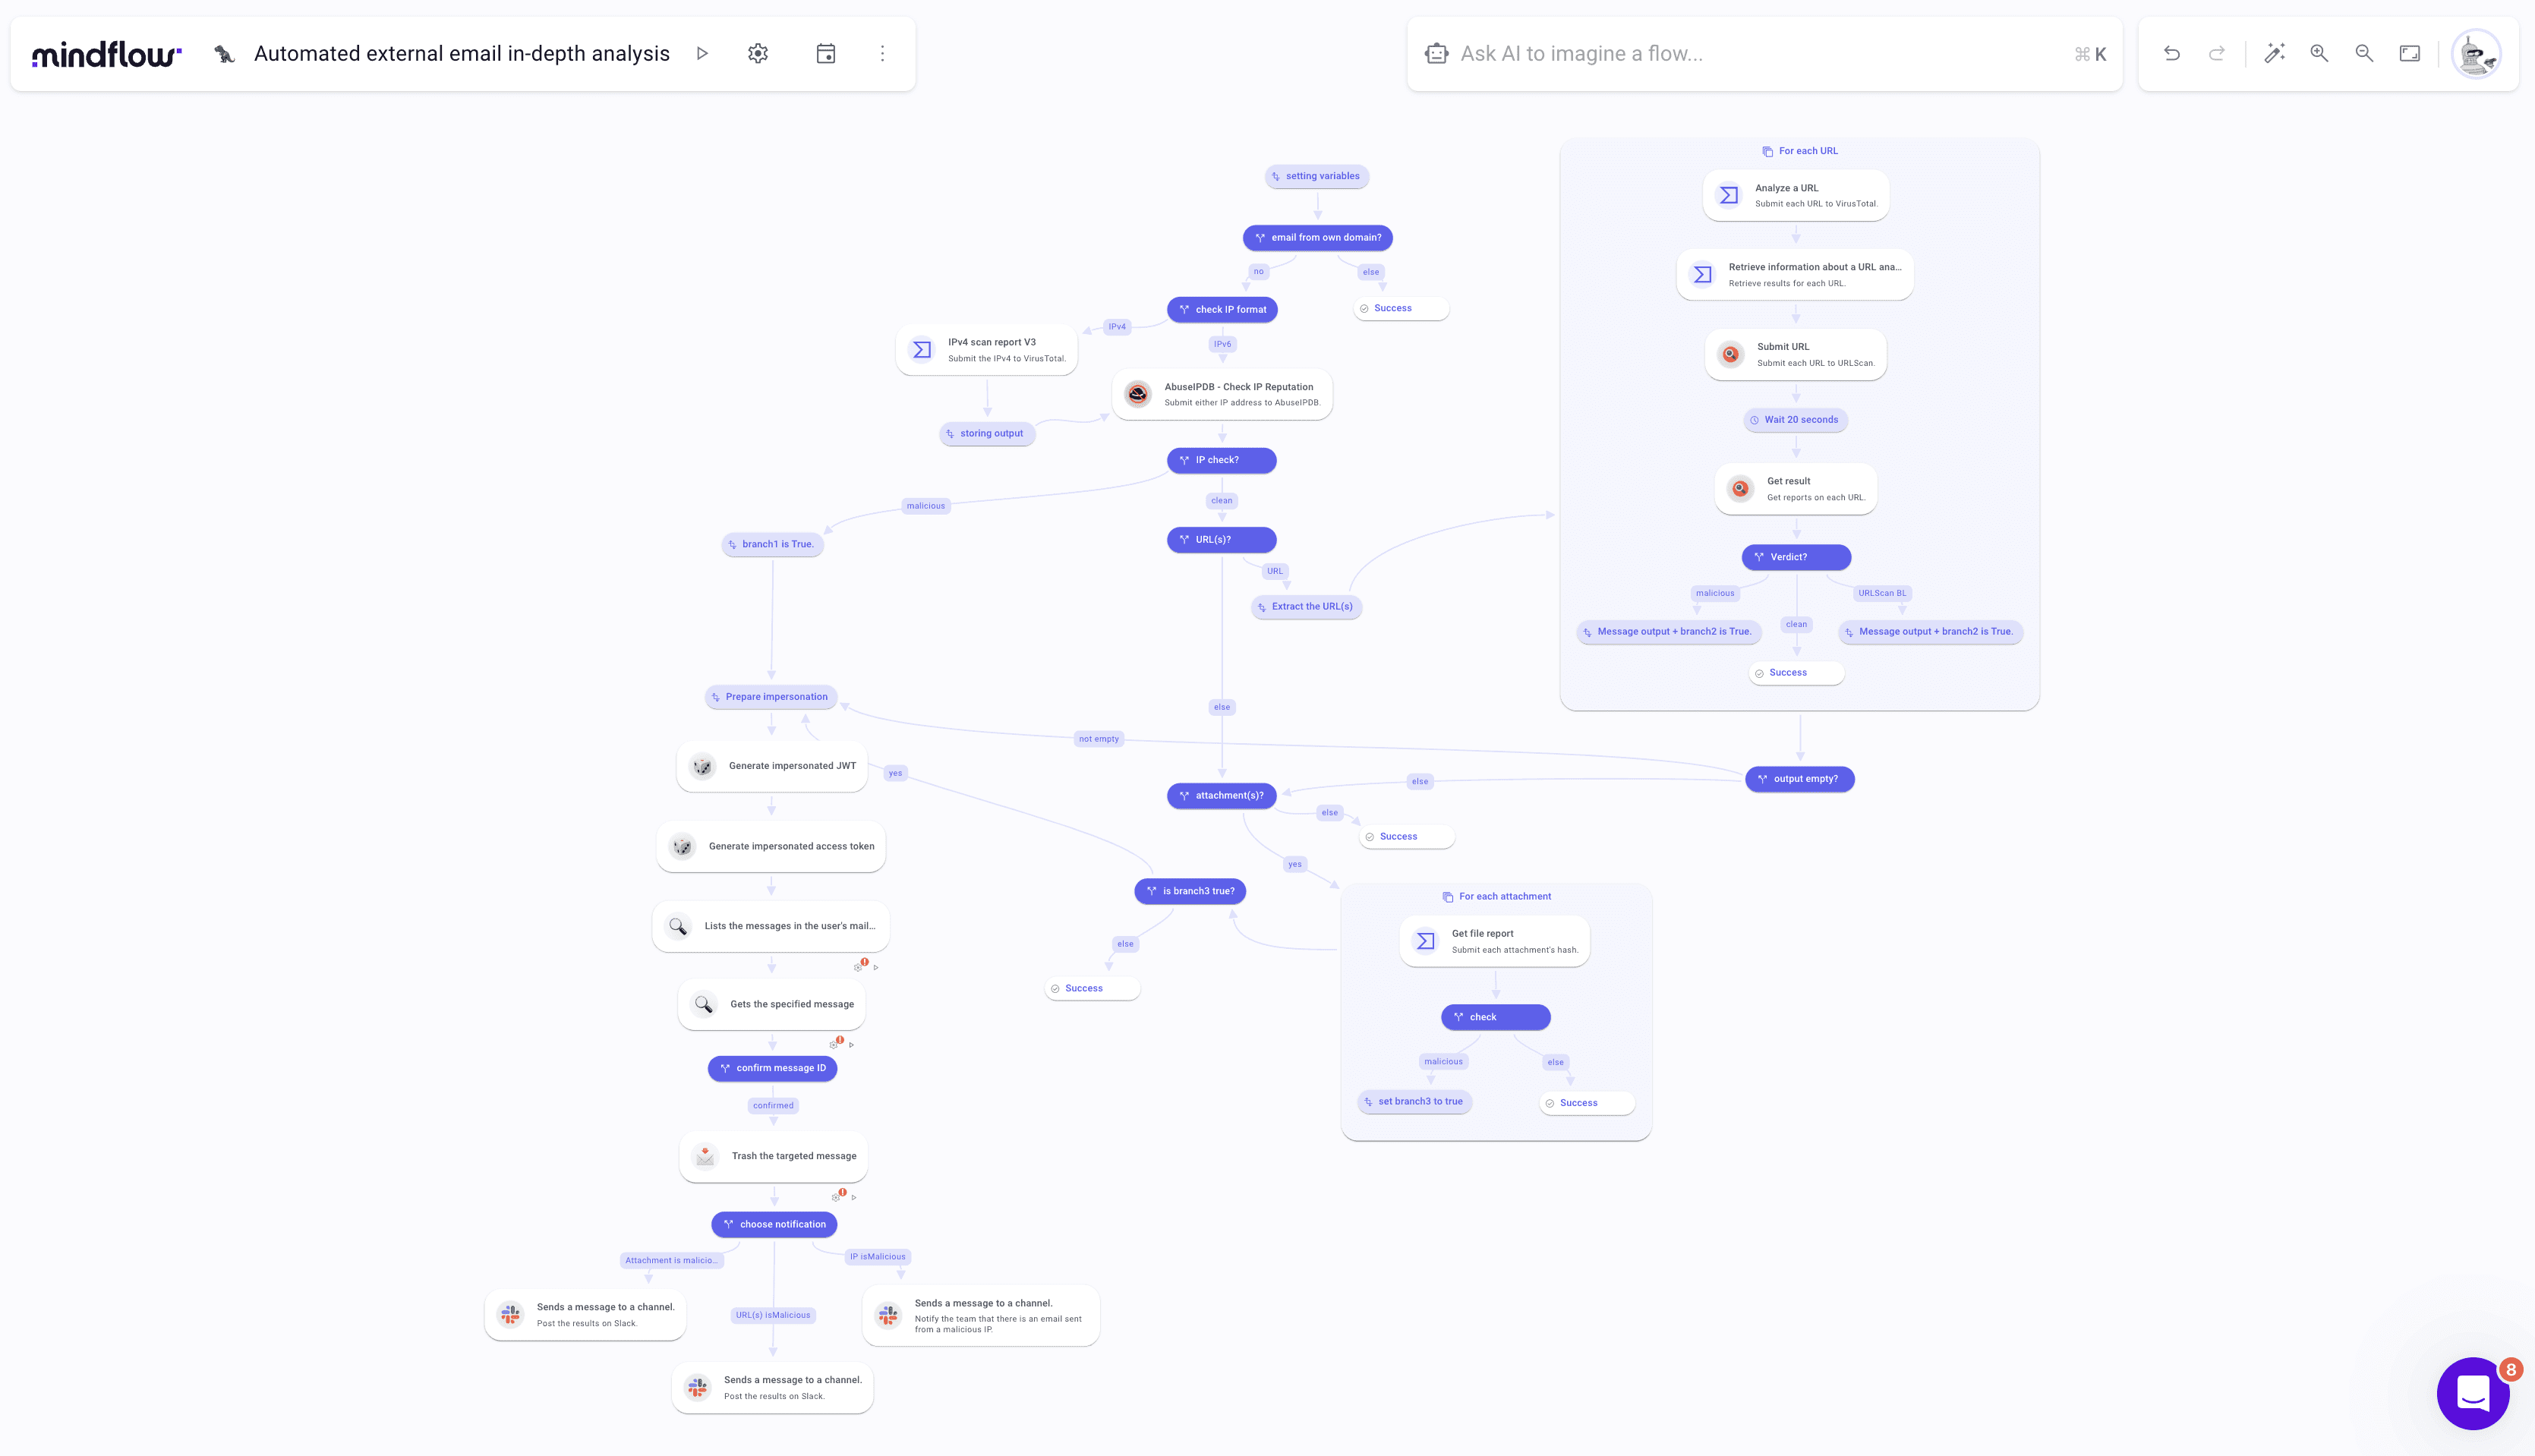
Today, we will learn how to enhance this analysis by analyzing attachments. For the demonstration, we will do this apart from the main flow. Well, I also don't want this post to be 5000 words :P! But have a look at what it could look like!
But first, let's have a quick chat about what this flow can help you achieve.
Detection and remediation of malicious email attachments: the numbers
Is creating such a flow worth it? To assess whether you should spend more time reading this blog post or stop right here, we will try to compute the benefits you will get from this flow.
First, how much time would you spend performing the task of analyzing email attachments manually? It first depends on how easy it is to get access to attachments. Let's say you create forwarding rules stating that all emails containing an attachment are forwarded to a dedicated address. When you receive a new email on this email address, you open it, save the attachment, and upload it to a third-party service like VirusTotal to perform an analysis.
According to the results, you would have to either notify the targeted user or programmatically delete the email through your mail service's API if you can.
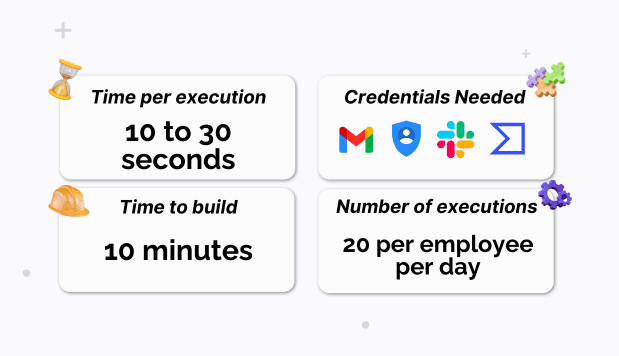
The whole process performed manually could take 2 to 5 minutes should you find a malicious email attachment.
First, with this flow, you will automate the ingestion of emails to analyze as well, not just the analysis in itself. We use forwarding rules to do so. The forwarding rule transfers the email directly to the flow via an emailhook. Second, each execution up to the remediation phase takes 10 to 30 seconds, depending on the number of attachments to analyze.
Third, it's automated. The analyst who otherwise would have to perform the analysis can do something else while the flow is running.
Second, how much time do you need to set up the flow? Of course, if you need 1 week to set up the flow, its benefits in the short term are not that obvious. Considering you have everything ready on Mindflow, the proper building stage is about 10 minutes—ten minutes to have a flow production-ready.
Third and last, let's consider the number of emails an employee receives daily. We can conservatively estimate that, on average, each employee receives around 20 emails per day. Most of them contain attachments, either in their signatures or actual documents.
Even for a company with 10 employees, analyzing every attachment is arduous. You could afford email security software, but at what price? This is where Mindflow brings so much value: it addresses many use cases and replaces other tools by orchestrating 4 tools.
Detection and remediation of malicious email attachments: the basics
Before starting the building process, we have to ensure that we have the credentials and scopes registered on the platform, which are Gmail, Google OAuth, Slack, and VirusTotal.
Google JSON Web Token
As we did multiple times here, we want to retrieve a JWT to authenticate as the user (Google documentation about the process here). In this case, we want to authenticate as the account on which we want to create Gmail delegations. To do this, we will need your service account email address, the private key, and the scope.
To fetch your service account email address and the private key. You can log in to the Google Cloud console, click IAM & Admin, and find "Service accounts" on the left tab. Click the service account you want to use to generate the JWT. Then, click KEYS and click Create a new key. Make sure JSON is selected and Create.
Now, open the JSON file your web navigator has downloaded and copy the full key. It starts from "-----BEGIN PRIVATE KEY-----" and finishing with "-----END PRIVATE KEY-----n."
Now, on to Mindflow's Vault. Create a new Credential, and fill in the fields as such:
Service: HTTP
Credential type: Google Service Account
Client email: Paste your service account email address
Private key: Paste your private key comprised in the JSON you just downloaded
Scope: paste "https://www.googleapis.com/auth/iam"
Slack
For Slack, it is faster. Fill in your workspace ID in this URL https://api.slack.com/apps/YOUR_WORKSPACE_ID/oauth? and ensure the Bot scope chat:write is granted.
Mindflow
Create a new flow. Name it "Detection and remediation of malicious email attachments" and choose its emoji. Once created, open it and click the gear icon on the top left of the canvas, next to the flow's title. Click the second tab named "Triggers" and copy the email address. This email address has to be pasted in Gmail > Settings > Forwarding and POP/IMAP > Add a new forwarding address.
Okay, the basics are done. We are ready to start building! Let's glance at the final flow.
Detection and remediation of malicious email attachments: building the detection steps
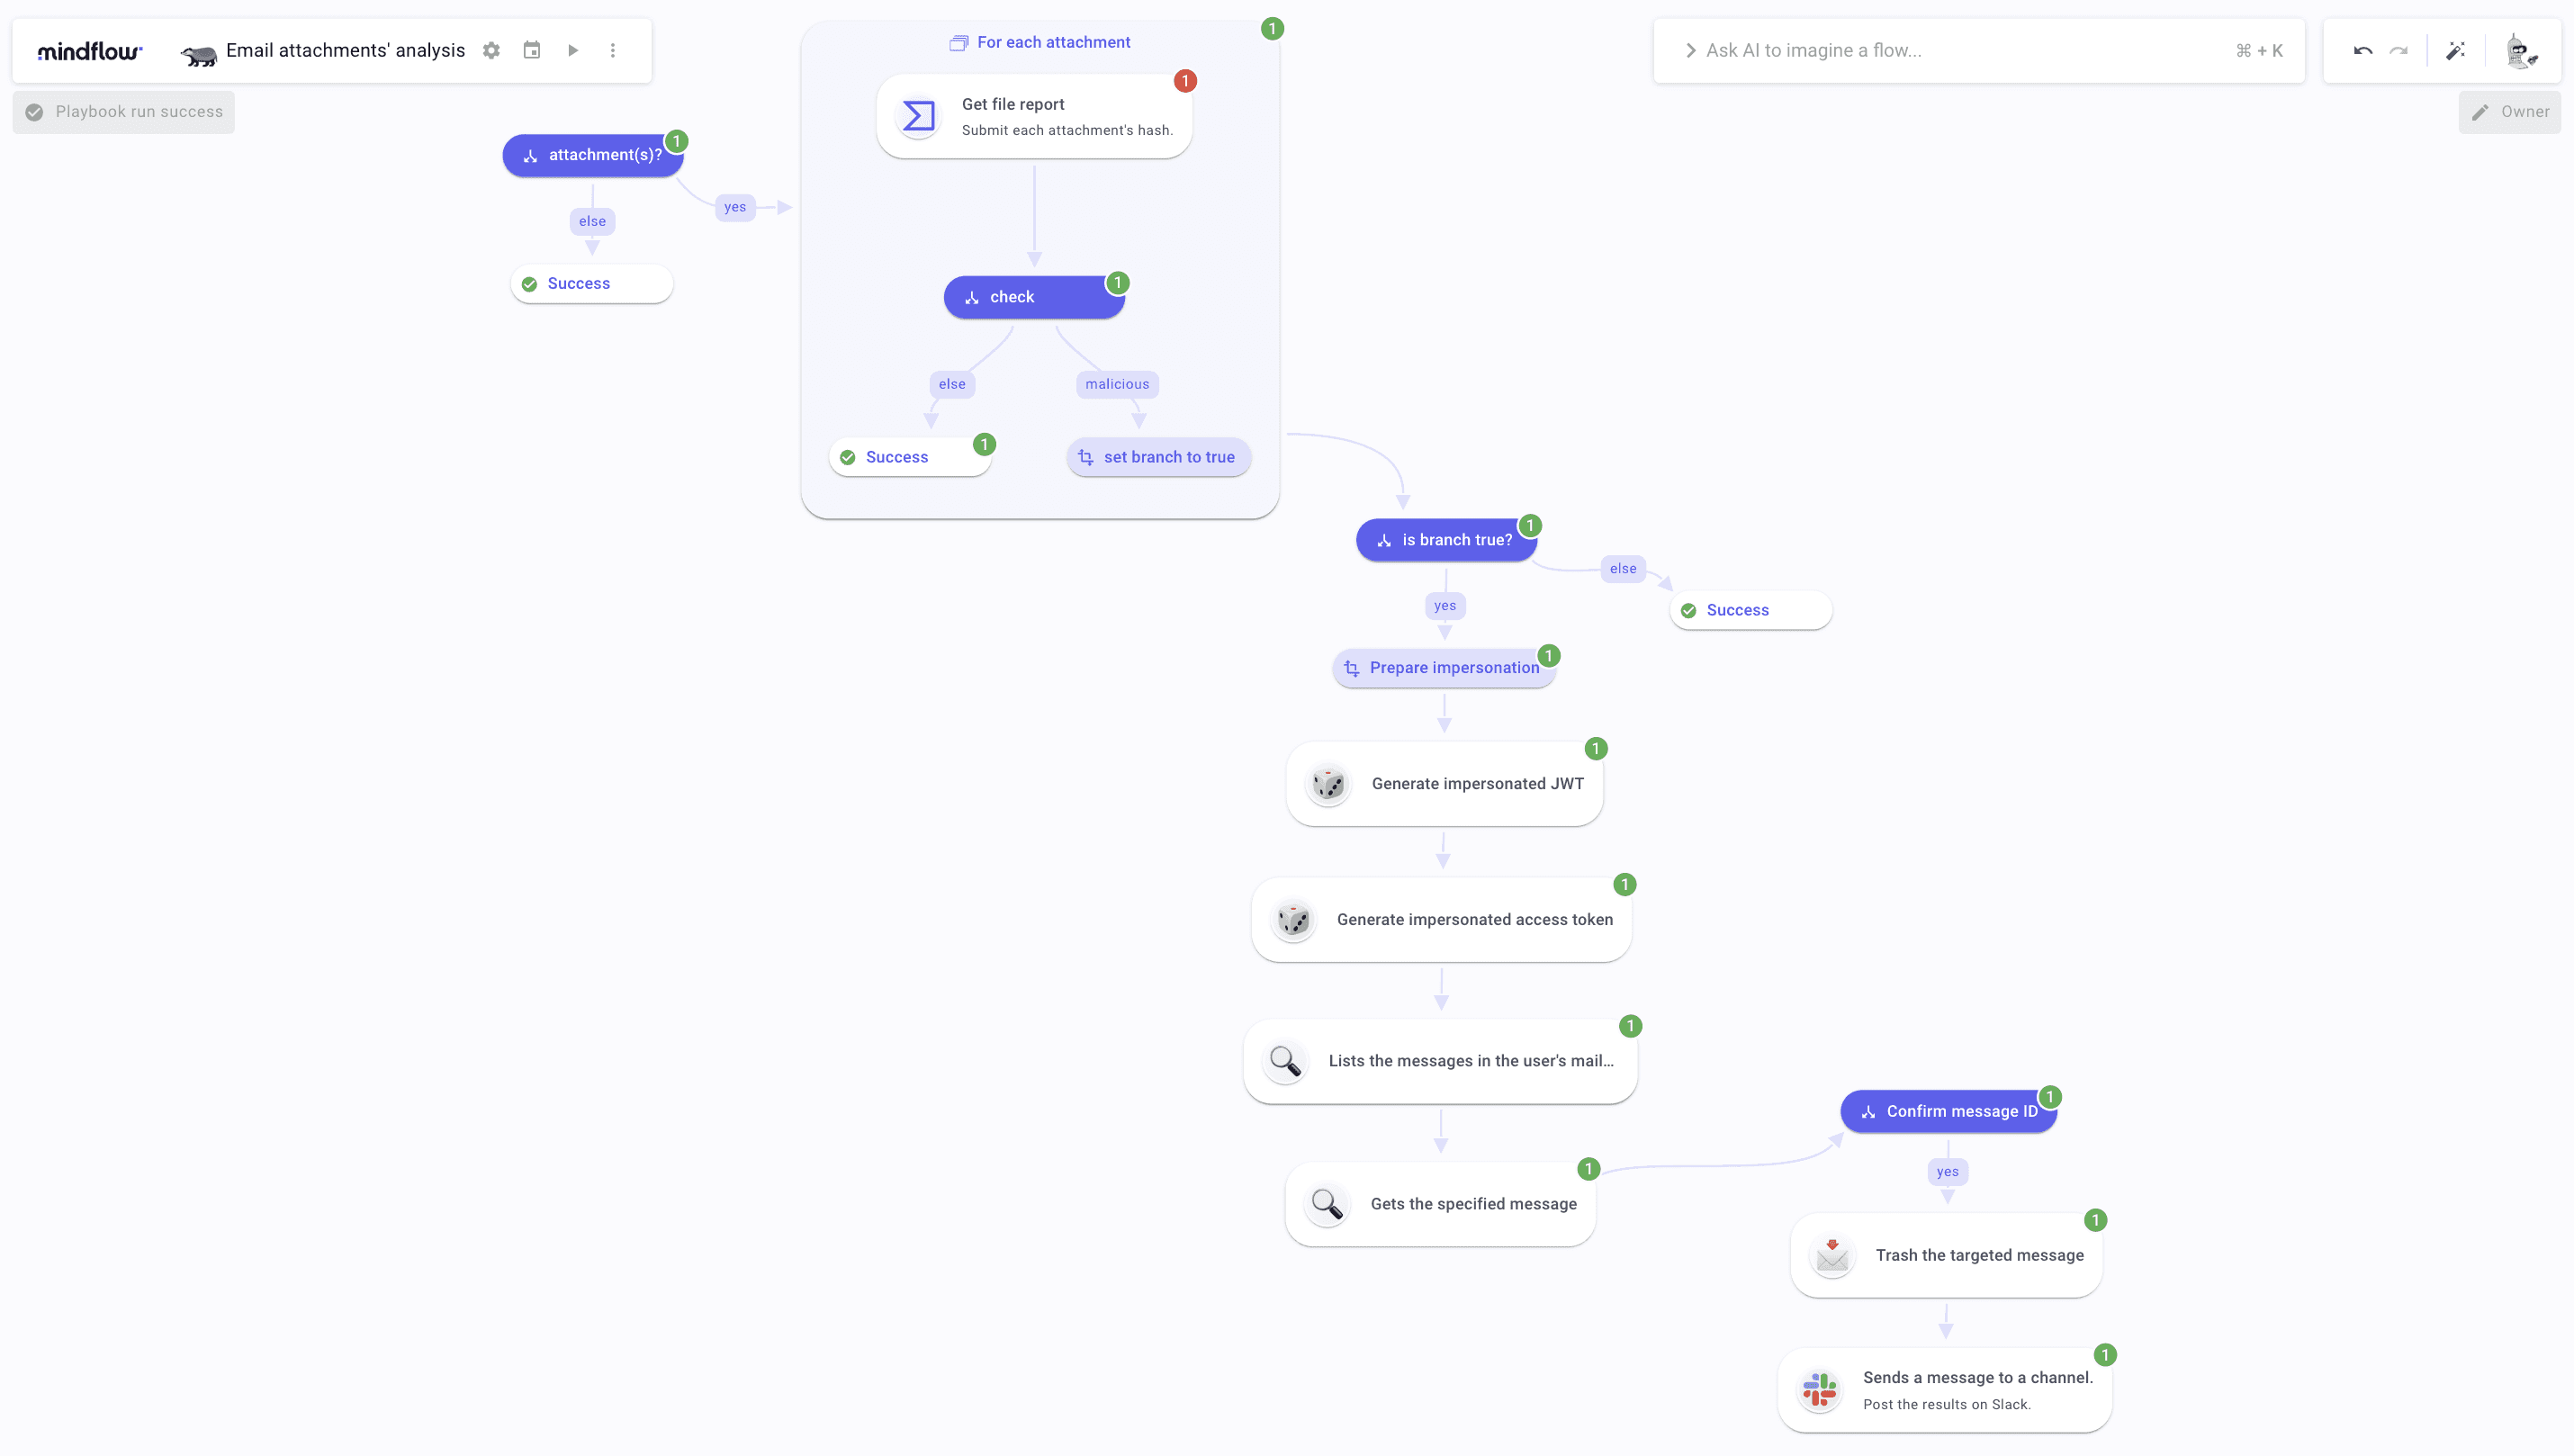
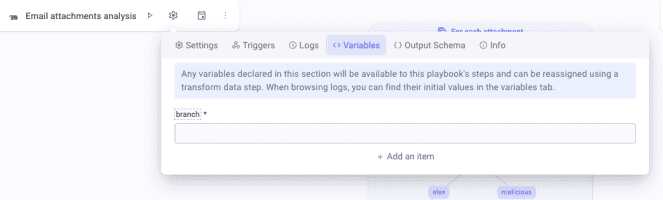
Let's get started with our Detection and remediation of malicious email attachments! The first thing you should do is create a global variable. To do so, click the gear icon and select the variable tab. Create a variable named branch and leave it empty. We will write about it later in the flow.
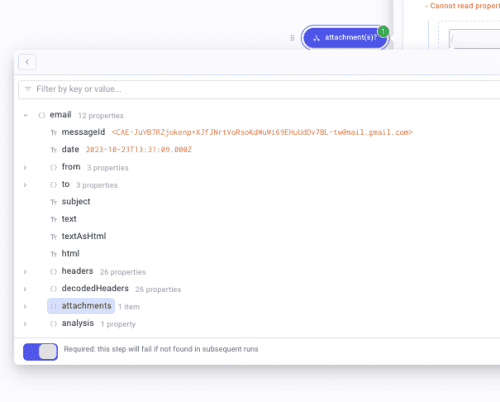
Then, send an email with an attachment to the address with a forwarding rule enabled to the flow you just built. Wait a few seconds for Mindflow to ingest the email, and you will see the flow being triggered. Then, create your first step, which is a condition named For each attachment. Inside the condition main panel, hover on the left of the second branch leading to Success to display the three dots. Click it and click "Mark as else."
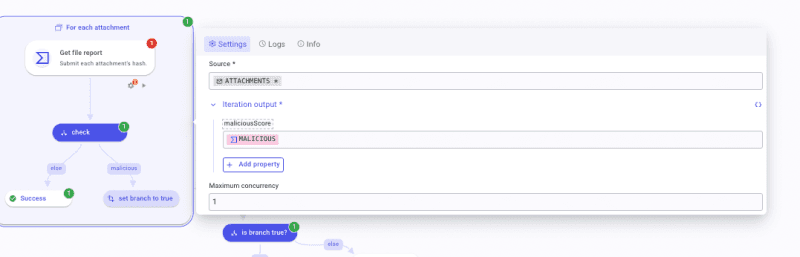
On to For each attachment. For each configuration table, open the DP in the parameter "Source" to select attachments again as your iteration source. In "iteration output," add a property named maliciousScore and leave it empty for now.
For each attachment, add a step and, in the Finder, type VirusTotalRetrieveInfoaboutFile and create the step. To fill the "Id" parameter, open the DP and select For each attachment in FLOW. Select items. Then, add a JSON Path function. As a path, write $.['checksum'] make sure the following booleans are on: Wrap, Quotes, and Prevent eval.
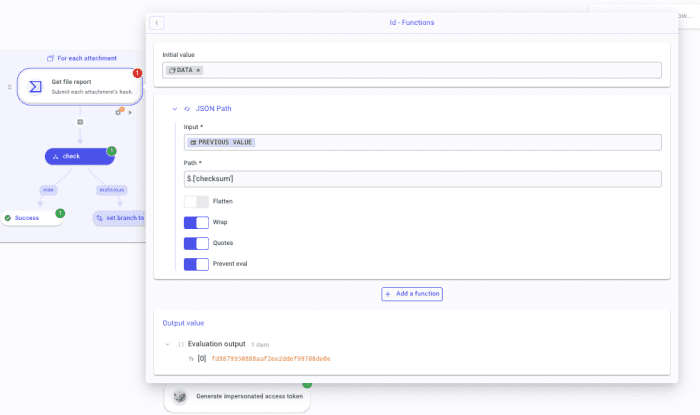
Ensure that, in the Settings panel of the VirusTotal (VT) step, the parameter "On request failure" is set to Continue execution. Why? If the submitted hash is not known by VirusTotal databases, the API call will return a 404. Also, make sure the VT credentials are filled out. Dry-run the step once to generate a log.
Once the execution is done, you can first go back to the For each configuration panel and fill in the maliciousScore parameter.
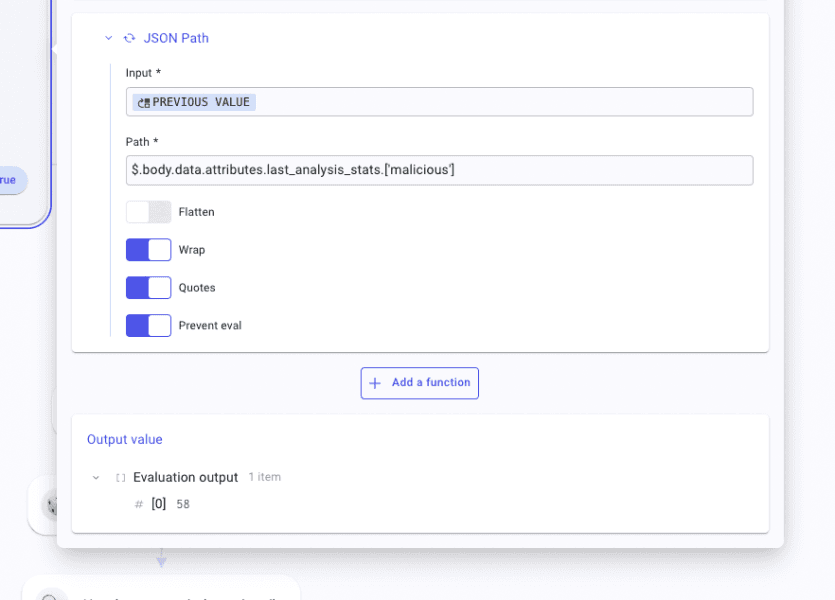
Since I know that we don't always have a malicious hash, the VT step returns a 404 with a payload that does not comprise the keys we would like to retrieve to pass on to other steps should the file be malicious. No worries! We can work around that by writing a JSON path.
To do so, open the DP and select the response (yes, the whole payload). Create a JSON Path function and paste this path $.body.data.attributes.last_analysis_stats.['malicious'].
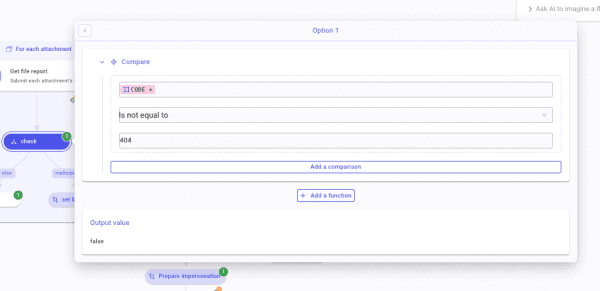
Good! Back in the For each. After the VT step, create a condition named check. Create two branches, one leading to a Success step and one leading to a TD called malicious. In the TD, create an item named branch and write true. Again, set the Success step as else. In the branch, malicious invoke from the VT step the key code via the DPT. Select the operator "Is not equal to" and write 404.
The For each configuration is done! After the For each, create a condition named is branch true? Again, two branches, one (yes) leading to a TD named Prepare impersonation, the other to a Success step set as else. In the condition's main tab, call branch, and set the operator to "Is true."
The first part is done! Let's head on to the remediation part now.
Detection and remediation of malicious email attachments: building the remediation steps
Let's proceed with the remediation phase of our detecDetectionremediation of malicious email attachments! To do so, we will need to create an impersonation flow, as we will need the user's permission to find and delete the malicious email.
Follow the steps below to do so:
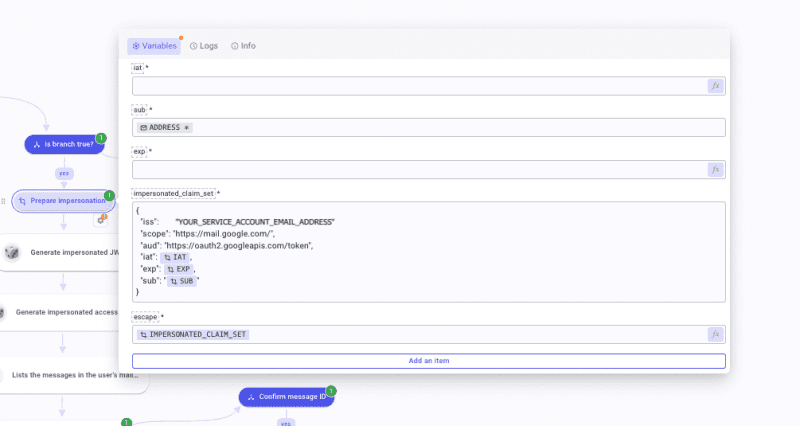
Open the Prepare impersonation TD. Inside, create 5 items that you will name: iat, sub, exp, impersonated_claim_set, and escape. Configure them as such:
iat(issued at): create a Get time function to generate the current Unix time in seconds.sub(the impersonated user): Pickaddressin the Email hook payload.exp: Again, create a Get time function in seconds and apply a Sum function where you will add 3600 seconds to the previous value, which is the current Unix time. This will set the lifetime duration of the JSON Web Token that we will generate later.impersonated_claim_set: paste and complete the following JSON:
{
"iss": "[YOUR GOOGLE SERVICE ACCOUNT ADDRESS]",
"scope": "https://mail.google.com/","aud": "https://oauth2.googleapis.com/token",
"iat": [call iat],
"exp": [call exp],
"sub": "[call sub]"
}
escape: callimpersonated_claim_setand apply an Escape string function configured as such: Escape level * special chars, escape quote * double, and JSON compatible enabled.
You are ready to proceed forward! From there, we will have to create HTTP Requests by hand. Create the first request, which is named Generate impersonated JWT token. Set Method * to POST. In URL * paste https://iamcredentials.googleapis.com/v1/projects/-/serviceAccounts/[YOUR SERVICE ACCOUNT ADDRESS]:signJwt. Open the Body section and mark it as JSON. Inside write
{
"payload": [Invoke Escape]
}
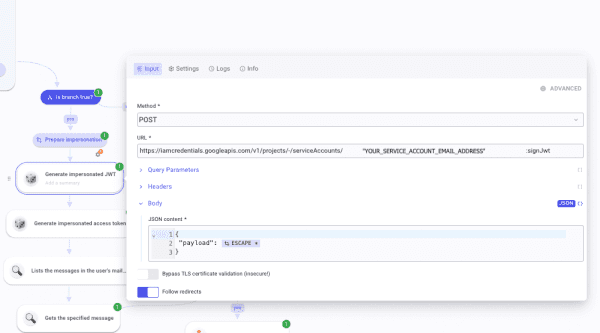
In the SETTINGS panel, make sure you have selected your JWT credential. Run it once to generate a JWT.
Once done, create another HTTP Request named Generate impersonated access token. Select POST and paste https://oauth2.googleapis.com/token in URL *. In Body as URL-encoded, create grant_type and paste urn:ietf:params:oauth:grant-type:jwt-bearer.
Below, create assertion and Pick signedJwt from the first HTTP Request logs. Run it once to generate logs. At this point, the impersonation process is done. Let's go and find the malicious message.
Create an HTTP Request with "Method" set to GET and the "URL" set to https://gmail.googleapis.com/gmail/v1/users/[call address from the emailhook payload]/messages. Then, in the Headers, create an item named Authorization and, again, write Bearer and call access_token. Dry run the step.
Create another HTTP Request with "Method" also set to GET and the "URL" set to https://gmail.googleapis.com/gmail/v1/users/[call address]/messages/[call id from the previous step that is inside message/[0]]. Dry run this step as well.
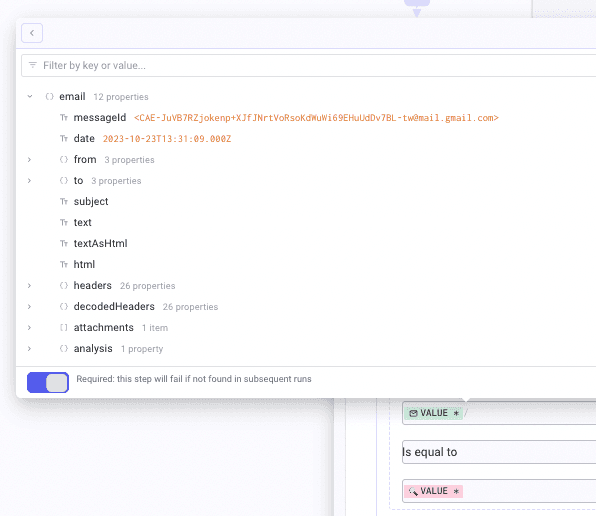
Then, create a condition named confirm message ID. Create one branch leading to another HTTP Request that is named confirmed. In the first field, call messageId from the email hook. Select Is equal to then, in the last field, open the DP on the previous HTTP step, and in body>payload>headers>header [22], pick value.
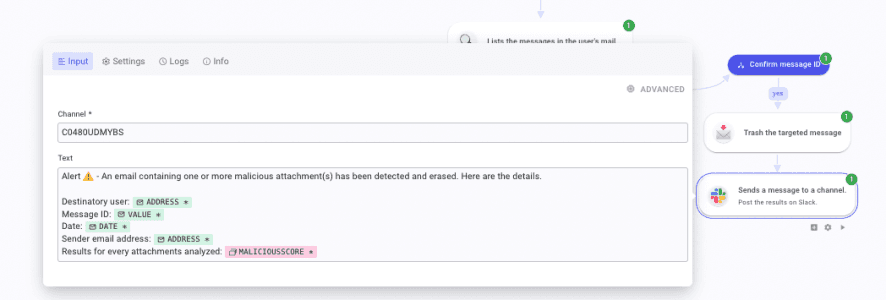
Now, let's configure the last HTTP Request. Set "Method" to POST and the "URL" to https://gmail.googleapis.com/gmail/v1/users/[call address]/messages/[call id from the Get Specified message step]/trash. Like the others, set the Authorization header with the token.
Finally, create a Slack step leading to chat_postMessage. Set the parameter "Channel" to the desired channel_id. Then, in "Text," you can type something like in the screenshot below.
Here we go! The flow is done! Detection and remediation of malicious email attachments automated. Congrats!